


We’ve already set up Account and Property settings in the Admin section of GA. Remember “part 1” of this 2-part series? Good.
Now it is time to set up Views for the 1st time in our GA account.
“But, Nontas, I have set it up already. It is not the 1st time I am doing that” I hear you say.
Well, my point is that everybody has a different definition of “set up”. My experience going into other people’s GA accounts has been that 90% of them just leave it as is with the default settings resulting in so many data gathering and optimizing opportunities going to waste.
What is a Google Analytics View and why would I need it?
A Google Analytics View is “way to view the data of your Property”. It is a set of rules you use to say to Google: “THIS is how I want to view my data”.
You might want to view your data in multiple ways. This is why you want to create multiple views.
What could be an example of that?
- Maybe you want to have a view that does not contain Google Ads data.
- Maybe you want to exclude known bots from your traffic and have more “true” data.
- Maybe you want to view traffic only from certain sources.
- Maybe you want to exclude the traffic from affiliates and employees, since these people usually visit your website everyday and skew the data considerably.
Do I need to have multiple views?
Yes you do. And sadly 86.1% of companies still have one (the default) view, which is a big mistake.
Don’t look it up. I just made up the stat, but you get my point.
You see, there is one problem with views: They are not retroactive. The rules you set for data gathering apply from the moment you create the view. So, if you have excluded bots from showing in your traffic, you cannot create a view that doesn’t exclude them and expect to see your past traffic with bots.
For that reason you need to create multiple views as soon as possible so that you gather the maximum amount of data in every view.
How many Google Analytics Views should I create?
First of all, you can create up to 25 views for each property, which of course is more than enough for most cases.
However, you should create at least 3 views:
- Raw data view: This view will include all your data, unfiltered. It is your backup if anything goes wrong at some point and you want to access data that have been filtered out in other views, or when something is deleted by mistake.
- Main view: This will be your default view, that will open whenever you open Google Analytics. This is going to be the view based on which you’ll be taking business and marketing decisions.
- Test view: Typically you’ll want to create a test view with the current configuration of your Main View (You can easily do that by duplicating your Main View). However, you will never use this one for anything else other than testing. Before applying any major change to the Main View, you’ll want to test the configuration first on the Test view, to make sure nothing breaks and that you won’t lose data.

Ok, that’s the short theory about Views. Time to configure some settings now.
View Settings
In View Settings, pay attention to the following:
- It is suggested to exclude known bots from your traffic. You only want to track data of real people. Google is pretty clever to understand what is a bot and what a human. Uncheck the bot filtering option only in the Raw View, because we want ALL the data there, unfiltered!
- If you have a search functionality in your website, turn on Site Search and add the search parameter in the respective field.
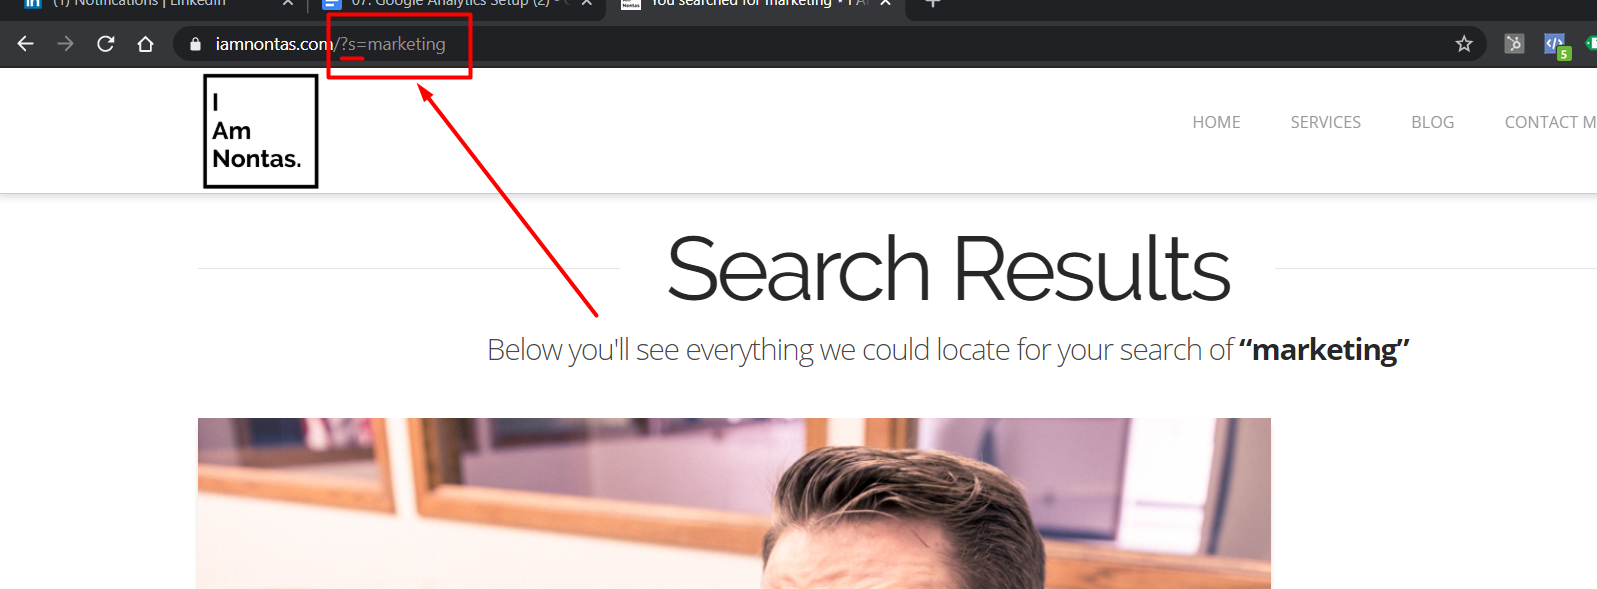
How do you know what is the search parameter? Just perform a search in your website and take a look at the url. In my case I searched for “marketing and in the url I see “s=marketing”. So “s” is my search parameter (“s” is the default search parameter for WordPress sites by the way).
That way Google Analytics will be able to provide data about things that people are searching INSIDE your website.
View User Management
This gives access to people only for specific views. It works exactly as in the Account and Property levels.
Why would you want to use this level of access for someone though? Imagine that you have sensitive data on your Main View (eg. sales data etc.). You want to give your new partner GA access, but you don’t want them to access these data. You could create a view just for him/her that excludes those data.
Goals
“Goals” is one of the most important features of GA. They represent important actions you want your users to take (eg form completions, purchases, reaching a certain level of engagement, seeing an important page, etc.)
Even though you can create up to 20 goals. Do not overdo it, as it can make the goals feature cluttered and harder to use. Tracking 2-7 high level goals is usually enough for most websites.
Content Grouping
Pretty advanced feature, but can be useful if you have a big website (eg an ecommerce website). Here you can combine pages together in custom-made groups so you can analyze them together.
Filters
Filters is the most powerful feature of Views, because this is the tool you use to filter out data and make your reports cleaner and more usable. You can find an extensive list of filters you can create in a separate article.
Channel Settings
If you go to Acquisition → All traffic → Channels you will see acquisition reports of every user defined channel. You’ll usually leave this setting alone but if the default acquisition channels don’t make sense for your business or you need to define a new channel, this is where you do it.
Ecommerce Settings
This is important. If you have an ecommerce shop, you’ll typically want Ecommerce and Enhanced ecommerce turned on. That way you’ll have transactional data available in GA. Major platforms like Woocommerce and Shopify are automatically integrated with this switch, but make sure everything is set up correctly with your developer.
Another interesting feature is that you can customize the funnel steps for the checkout. They are automatically generated with the integration but sometimes you’ll want to modify them a bit. These tunnel steps are used in the “Shopping Behavior” graph, under the ecommerce section in “Conversions” tab.
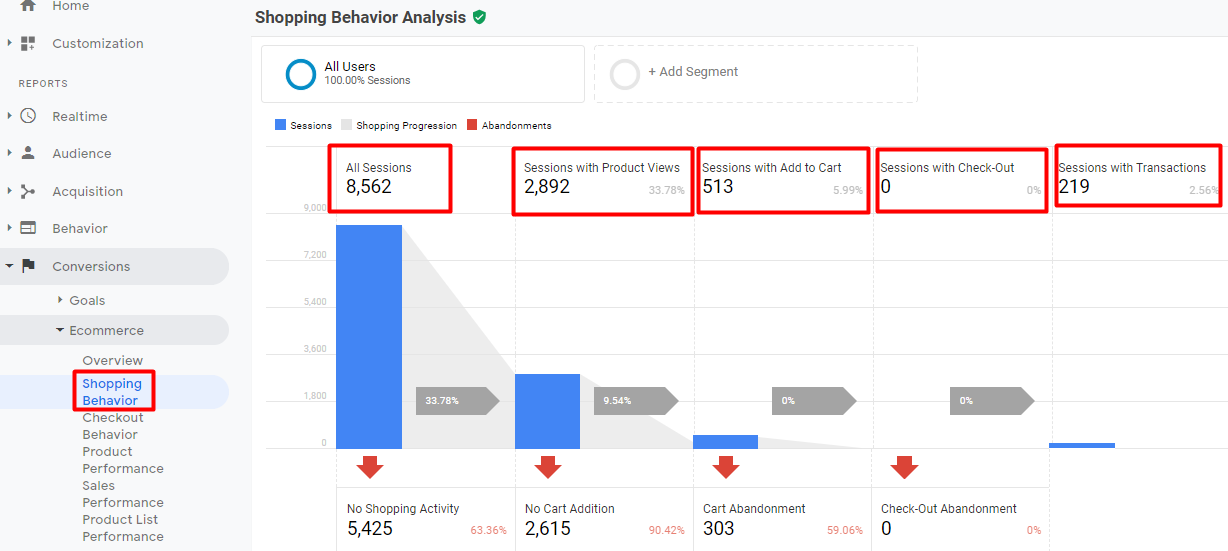
In the above picture for example we see 219 sessions with transactions but zero sessions with the “checkout” step. That means that this step should be properly set up in the ecommerce settings.
These are the most important settings to tweak as you get you started with Google Analytics Views. In the “PERSONAL TOOLS & ASSETS” section you will find advanced settings, but will come in more useful in later stages.